Find internal link opportunities using Screaming Frog
Internal links are one of the most important elements of Search Engine Optimisation (SEO).
Hyperlinking from one page to another helps Google understand the relationship between certain pages and, overall, the hierarchy of your website.
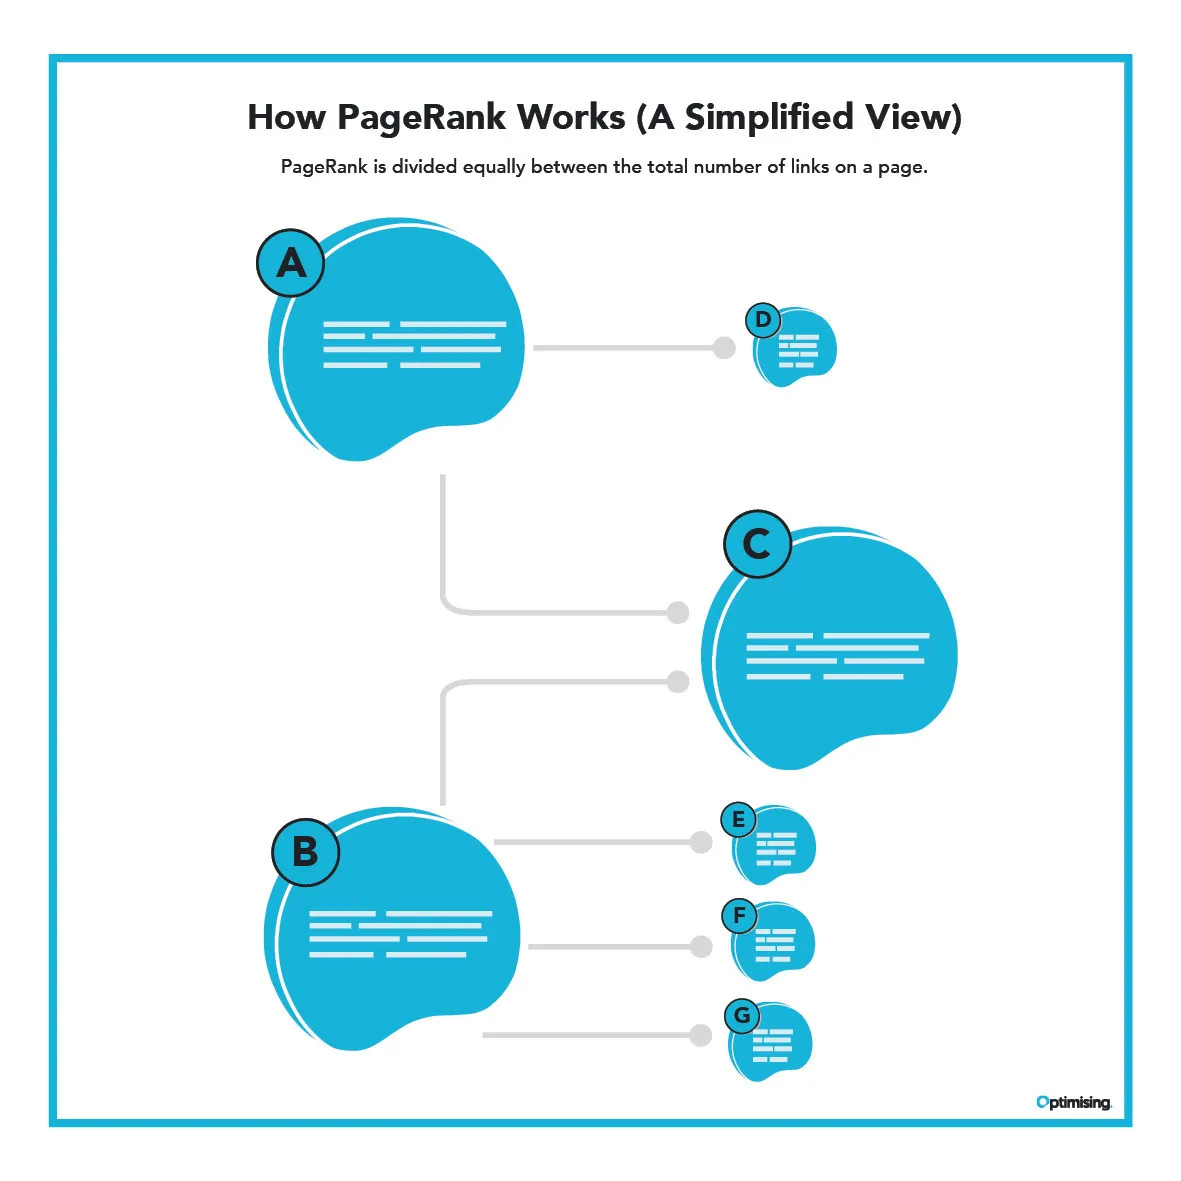
Links also pass ‘PageRank’, which is basically a fancy way of saying that they transfer authority between pages.
In the same way that an external link to your homepage or services pages from a trustworthy website passes PageRank from their site to yours, internal links can distribute PageRank between the pages of your website, which helps those URLs rank for particular terms.
Did I just say ‘Page’ way too many times!? Sorry about that.
Why should I use Screaming Frog (SF) to identify internal linking opportunities?
At the moment, there’s a lot of chatter on Twitter and other platforms about the advantages of using programming languages such as Python or Ruby for SEO.
There’s been a number of posts detailing how to search for internal link opportunities using a combination of SF and Python. David Gossage wrote a great blog post and script outlining how to do this for an ecommerce website, which a few members of the Optimising team have been experimenting with.
At Optimising, we’re big fans of using programming languages to automate large-scale SEO tasks like matching URLs to redirect after a migration. However, for junior SEOs, or the many that are new to our growing industry, using another programming language can be somewhat of a steep learning curve.
If you’re new to coding, or just want to start with a simpler solution to finding internal linking opportunities, you’ll be happy to hear that you can achieve a lot simply using the features of the Screaming Frog SEO Spider.
SF also has a free version that allows you to crawl 500 URLs right out of the box. That’s a perfect amount if, for example, you’re looking for internal link opportunities across a small to medium-sized blog on an ecommerce store that wants to add more links to collections or specific product pages.
Conducting the initial search
In this example we’ll be pretending that we’re auditing the Optimising.com.au blog and searching for terms like ‘SEO’ and ‘search engine optimisation’ as a way of identifying opportunities to link to our SEO services 😉.
Adding your keywords
1. Open Screaming Frog and click ‘Configuration > Custom > Search’
2. Click ‘+Add’ and name your column in the box that is labelled ‘Search 1’. I usually just name the column the same as the keyword, like in the example below
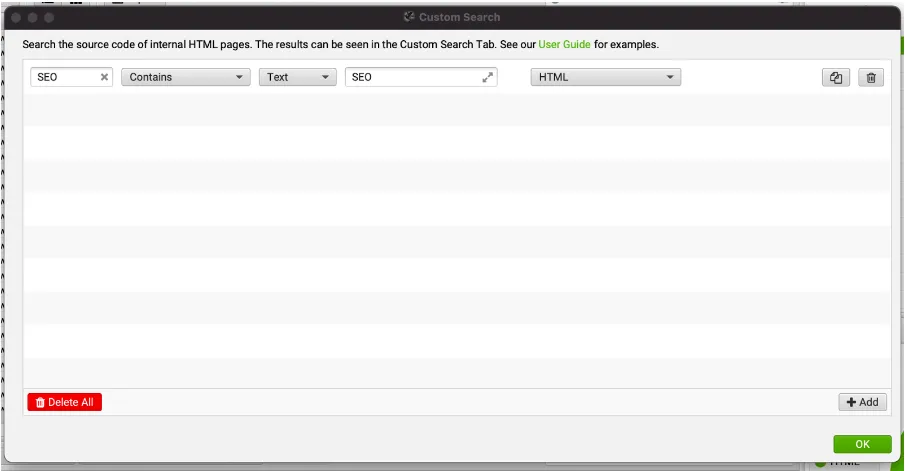
3. Add your keyword – in the example above we’ve chosen simply ‘SEO’
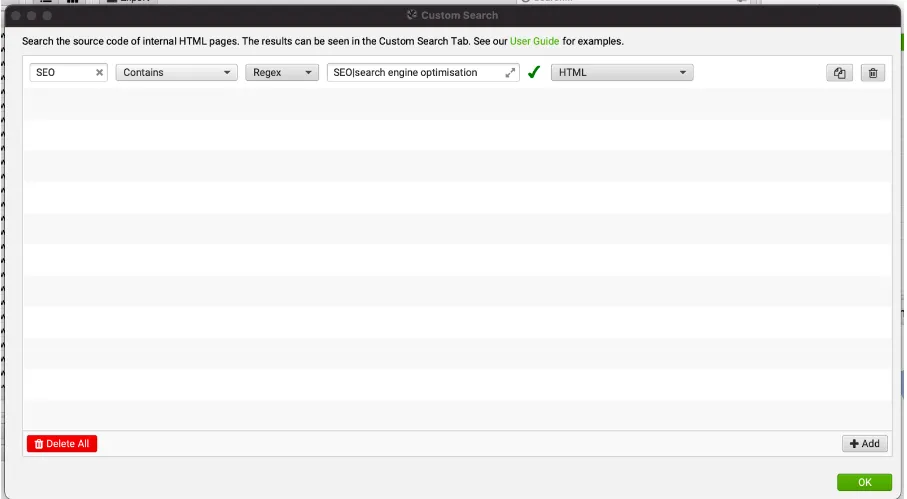
4. Pro tip: You can search in Text or by using Regex. The main reason I would use Regex is to search for synonyms. You can use the pipe to separate between similar terms. For example you could search for ‘SEO|search engine optimisation’, which will result in SF returning results for both terms.
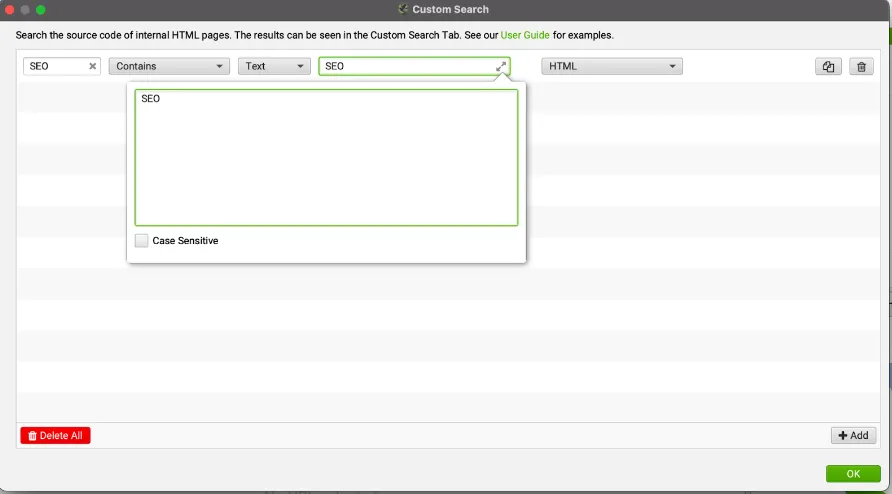
5. Optional: You can make your search case sensitive by clicking the arrows next to the keyword. Note: this only works when searching in ‘Text’ and not ‘Regex’.
6. Click the ‘HTML’ dropdown and select ‘Page Text No Anchors’ – this will mean that the spider will only return results that are not already in an anchor tag. This helps you to identify opportunities for internal links, rather than just returning existing links.
7. If you’d like to conduct your search at this point you can click the green ‘OK’ button and you will return to the main SF interface. However, we have a few more tricks up our sleeves to help you get the best results.
Excluding pages that already have internal links to the correct URL
The settings that we’ve demonstrated above work fairly well. However, the fact is that they may return pages where an internal link is already present as there are multiple mentions of that specific keyword.
From a UX perspective, you don’t want to hyperlink everytime your SEO agency mentions SEO because this can start to look a little messy/spammy.
In my opinion, when looking for internal link opportunities, it’s important to prioritise pages that don’t have any internal links to your target, but do mention your chosen keywords.
So how would you navigate this dilemma? I’m happy to say, it’s actually fairly simple!
It begins with another custom search immediately after our target keyword. This time we’re effectively going to create another custom search that identifies when the page is already linking to our target destination.
1. Click ‘Configuration > Custom > Search’.
2. Click ‘+Add’ to create a new row in the custom search pop-up (fun fact: SF can handle up to 100 custom search filters at once) and click ‘Search 2’ and name your column ‘Keyword + URL’.
3. This time, you want to click the ‘Text’ dropdown and select to search using ‘Regex’. The reason that we’re going to do this will soon become clear.
4. Find the URL on your website that you want to find internal linking opportunities for and choose just the path. For example, Optimising is looking for internal linking opportunities for their SEO services so the URL they want is: https://www.optimising.com.au/seo – the path in this URL is ‘/seo’.
The diagram below shows the different components of a URL and will hopefully help you find your URL path.
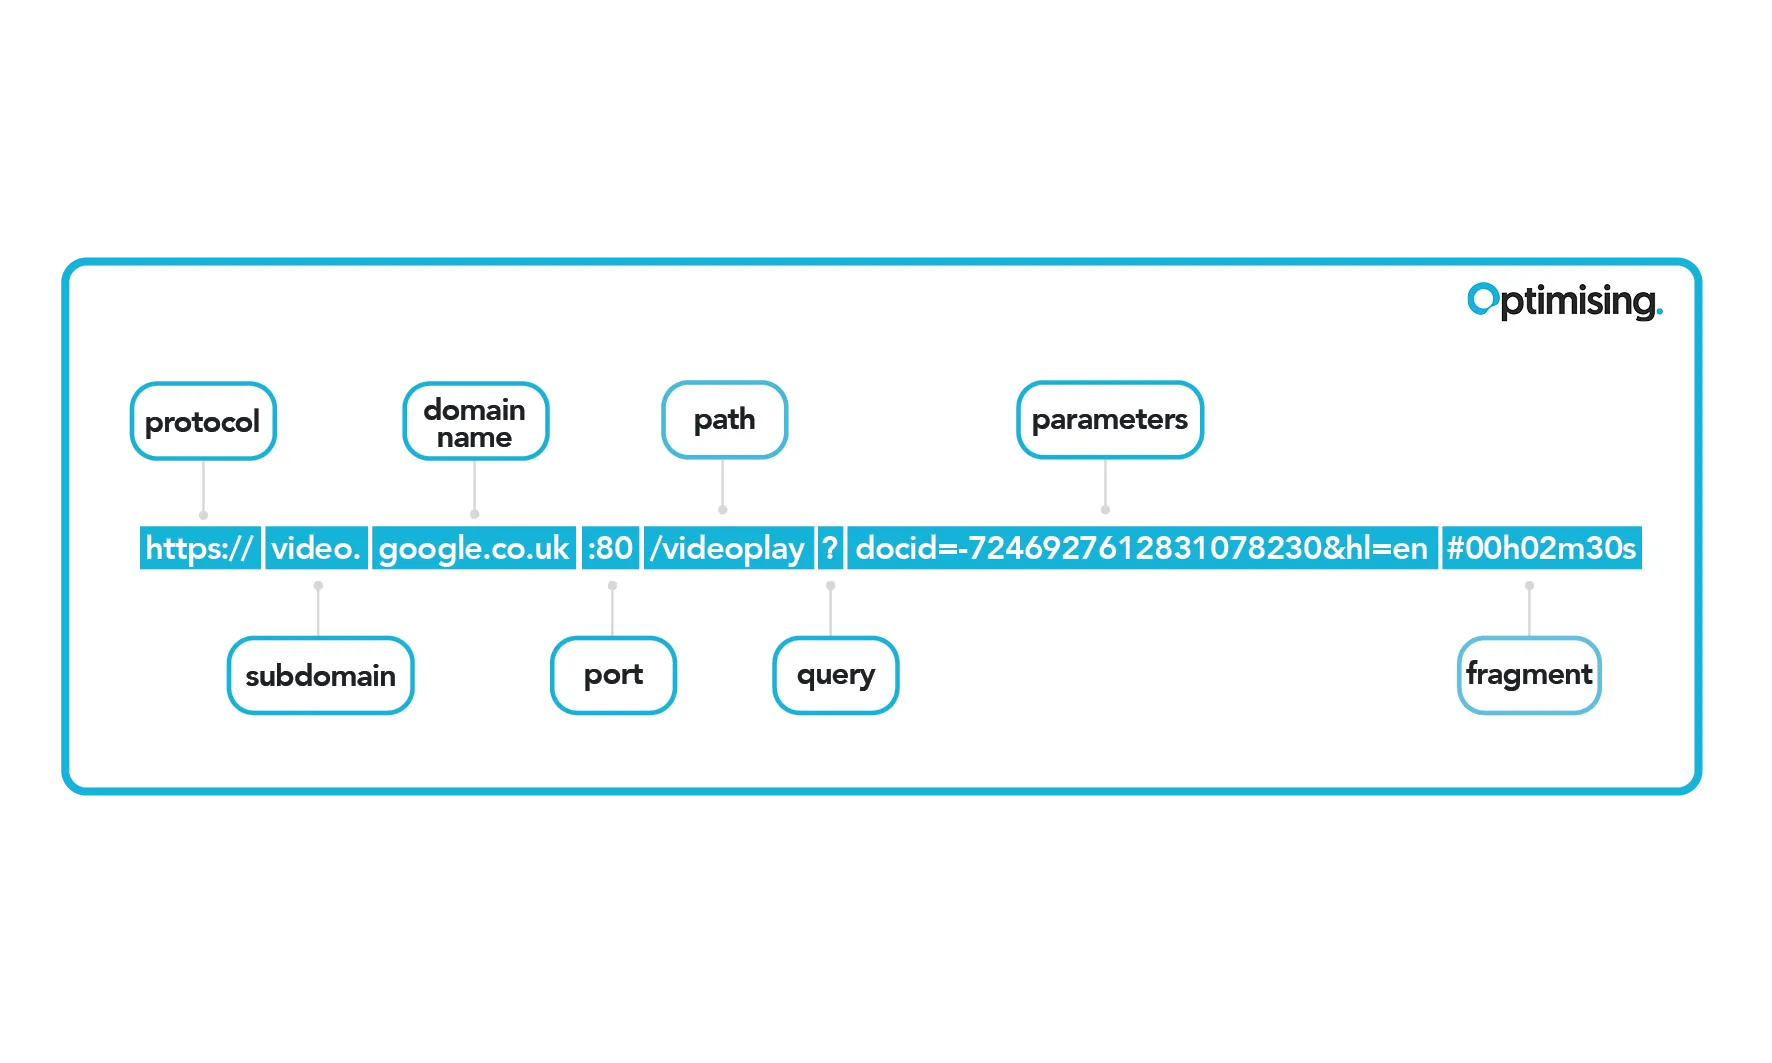
5. Click on the ‘Enter search query box’ and enter your URL path with a backward slash before it. So in this instance our search query would be ‘\/seo’ (we have to add the backward slash because in regex will throw an error if we have a forward slash on its own).
Note: Essentially, what we’ve done here is we’ve told SF to search for any links to the SEO services page, or any URL that contains ‘/seo’ – if you have links to subfolder URLs, such as ‘/seo/site-audits’ that you want to exclude you’ll need to add a $ at the end of the regex query.
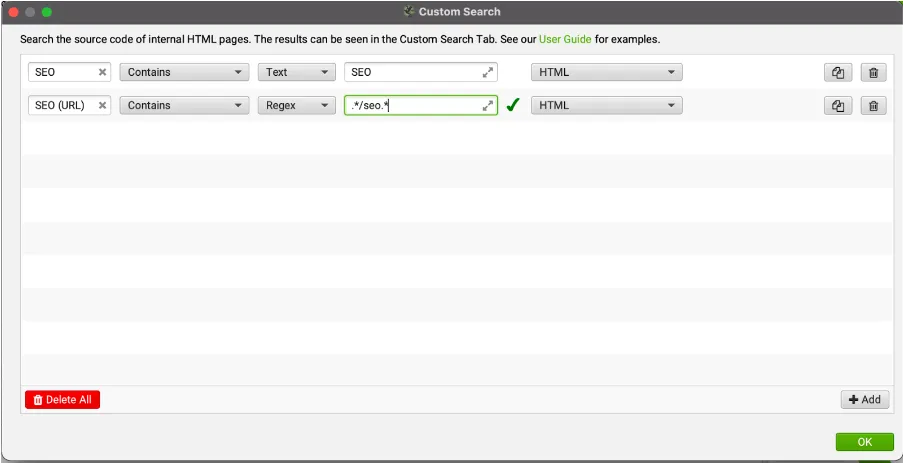
6. This time you can just leave the ‘HTML’ dropdown set to its default (HTML).
7. If you’d like to conduct your search at this point you can click the green ‘OK’ button and you will return to the main SF interface. This time SF will return results showing unlinked brand mentions and the number of links on that page to the destination URL. However, if that’s not quite good enough for you we have a couple more tips to make this process as robust and useful as possible.
Refining your search area
There may be instances where you’re searching for a keyword/URL, but for some reason you have that keyword or URL somewhere else on the page that you don’t want to appear in your search results as you’d consider it a false positive.
One example may be ubiquitous links to services in the form of a call out box/call to action. Despite being a link to your URL it doesn’t have the same level or contextual relevance that a regular internal link does, which may be why you want to exclude it.
In this instance we can specify to SF exactly where you want to conduct the search, or where you don’t want to conduct the search. Here’s how:
- In SF click ‘Configuration > Content > Area’ to bring up the below menu.
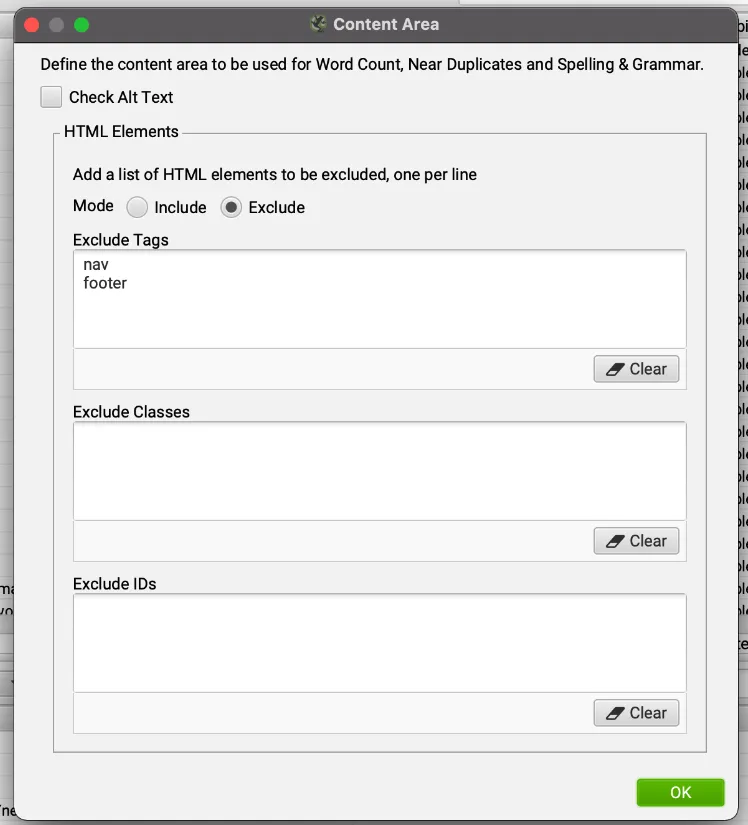
2. In this settings menu you’ll see that you can exclude certain areas from the search – either by HTML tag CSS classes, or CSS IDs. The ‘nav’ and ‘footer’ are already excluded from searches, but you can add additional tags (or even remove these tags if you are conducting a search that relates to the nav or footer).
3. Once you’ve added your HTML tags and CSS classes/IDs, you can click ‘OK’, return to the main interface, and conduct your search.
Refining your search using include/exclude
I really love the include/exclude feature in SF. It can save you a bunch of time as it allows you to zero in on just the pages that you want included in your search.
This is particularly useful on platforms like Shopify and Wordpress where you’ll often have discoverable URLs that are not indexable, such as tag pages, author pages, category pages, etc.
To add add URLs like these URLs to the exclude list do the following:
- Click ‘Configuration > Exclude’ to bring up the settings menu pictured below.

2. Add a list of regular expressions – the example SF have used is an entire folder, but if you want to exclude certain taxonomy pages you might have a list like below.
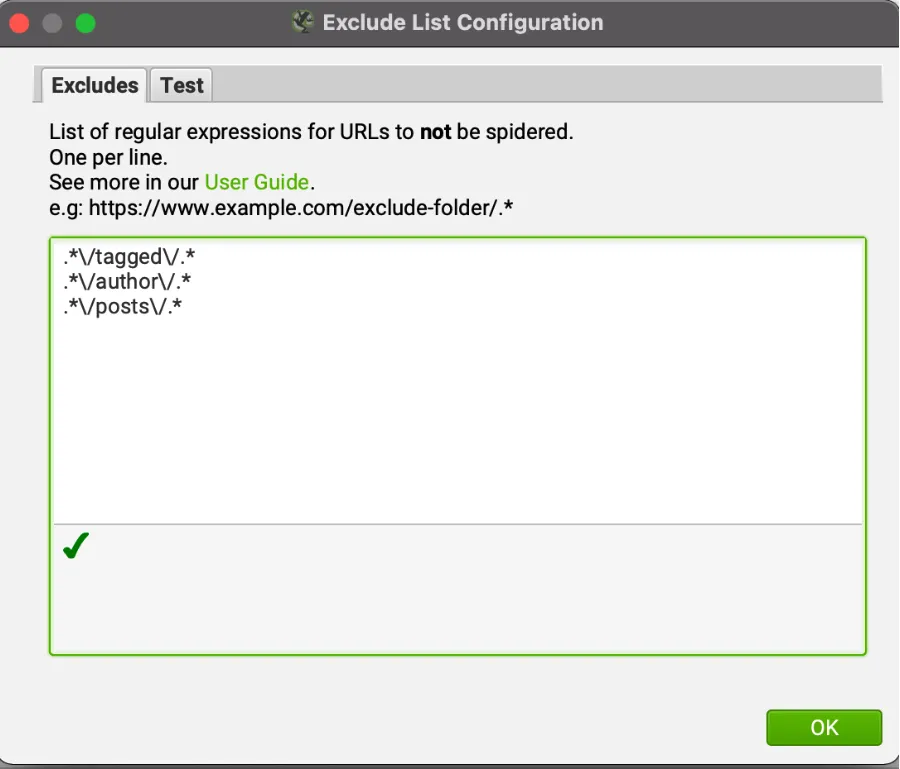
3. Click ‘OK’ and conduct your crawl. Now you’ll only see pages that don’t include those strings.
Note: You can do the exact same thing using the ‘Include’ option if you’d like to only include certain URLs.
Prioritisation
If you’re conducting a search for a fairly small site you may be able to sift through all the pages manually and select which pages to update. However, once you start passing a couple hundred pages it can become a little bit hard to keep track of/execute.
On top of this, you want to add internal links to pages that are going to have the most benefit for the target URLs. It’s often the most popular URLs on a site that are the most valuable locations to place an internal link.
My advice is to prioritise the pages using the API options that SF has available within the interface.
For search visibility you can use the Google Search Console API – this will give you an idea of which pages get the most impressions/clicks.
If you’d like to see which pages are most important to your organic users (this metric is slightly different from the data on pure organic visibility provided in Search Console) you can connect your Screaming Frog to your Google Analytics account fairly easily.
To do this, do the following:
Click ‘Configuration > API Access > Google Search Console/Google Analytics’
1. Click ‘Connect to New Account’
2. SF will take you to your browser – once here, login with your credentials to your Google account
3. Once authenticated in the browser, return to Screaming Frog and select your Account, Property, View, and Segment if applicable
4. Click ‘OK’ and conduct your crawl
Once you’ve connected to Search Console/Analytics you can export the data into Google Sheets, Excel, or a CSV file and sort by the number of clicks/visitors each page has. This will make the task much more approachable/beneficial.
Thanks for reading the Optimising guide to finding internal links using Screaming Frog. Our aim with this guide was to make identifying internal linking opportunities accessible to anybody with a laptop and a current version of SF.
I think that many of us in the technical SEO space can get so carried away experimenting with new approaches to our daily tasks that we can forget just how powerful our existing tools can be.
SF is honestly one the best tools that a technical SEO can have in their arsenal. Finding internal links is just one of a nearly endless number of tasks that you can do.
Here are a few other cool ideas for you to try next:


